Version 1.11 | Language: English
The LISYclock Config Editor is a tool for
conveniently editing the config.txt configuration file of
the LISYclock.
LISYclock_config_editor.html file, no server, no build
stepLISYclock_config_editor.html in your
browser and get started
| Browser | Support |
|---|---|
| Chrome / Edge (recommended) | Full support including File System Access API (native open/save dialog) and Web Serial API (USB connection) |
| Firefox / Safari | Functional for file editing, but uses
<input type=file> / download link as fallback; USB
mode not supported |
LISYclock_config_editor.html from the project
directory locally in your browser (double-click or
File → Open)Important: For direct communication with the LISYclock via IP (tab “Clock”), the file must be opened via
file://– not via HTTPS. Browsers block HTTP requests from HTTPS pages for security reasons. USB mode works regardless of how the file is opened.
The buttons in the navigation bar (top) control all file operations:
| Button | Function |
|---|---|
| Open | Opens an existing config.txt from the local file
system |
| Save | Writes the current configuration back to the opened file (only active when a file is open) |
| Save As… | Lets you choose a new target file and saves to it |
| New Configuration | Resets all fields to default values (caution: unsaved changes will be lost) |
The current filename is displayed in the center of the navigation bar. As long as no file has been opened, “— no file open —” appears there.
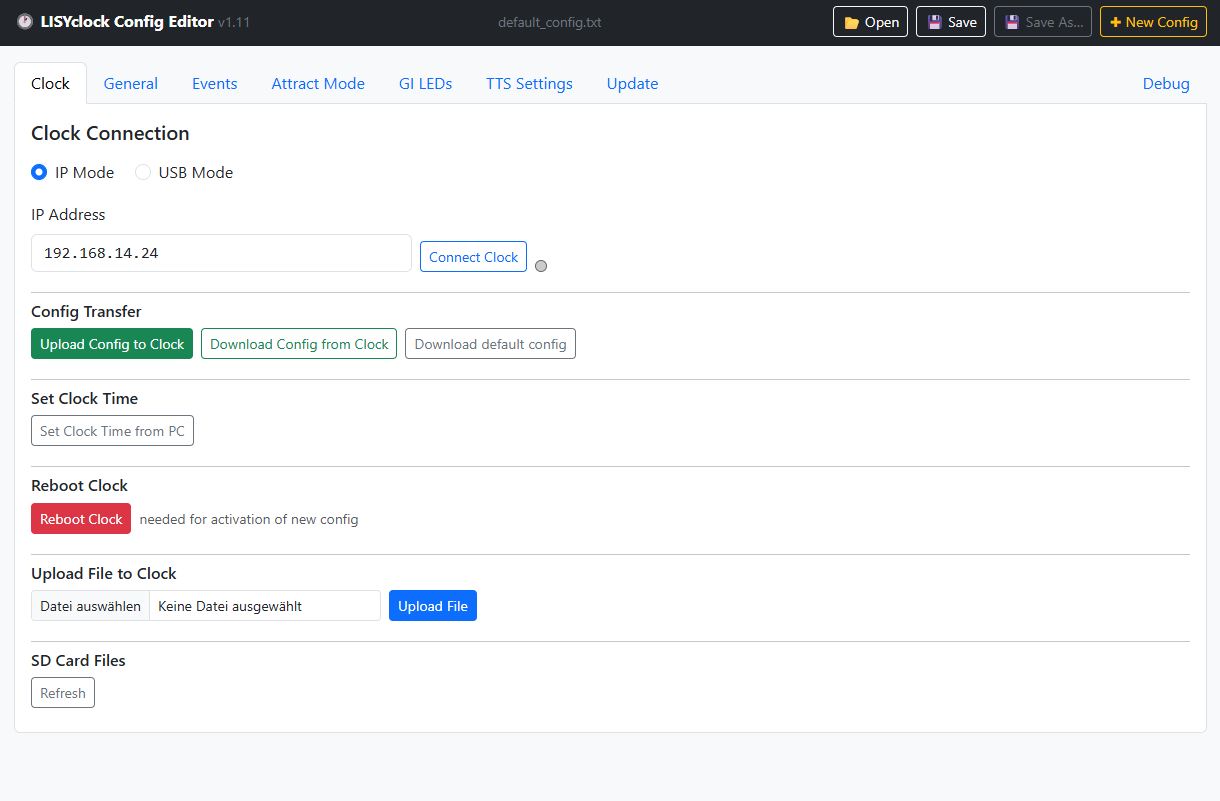
This tab enables direct communication with the LISYclock hardware. Choose between IP Mode (WiFi) and USB Mode (USB cable).
Select the connection type using the radio buttons at the top of the tab:
| Mode | Description |
|---|---|
| IP Mode | Connect to the clock over the local network via its IP address (requires WiFi) |
| USB Mode | Connect to the clock directly via USB cable (Web Serial API, Chrome/Edge only) |
Enter the IP address of your LISYclock
(e.g. 192.168.1.42). The address is saved in the browser
and automatically pre-filled the next time you open the editor.
Clicking Connect Clock checks whether the clock is reachable:
| Display | Meaning |
|---|---|
| Grey | No test performed yet |
| Green | Connection successful |
| Red | Connection failed |
On successful connection, the firmware version and API version are shown. If the API version does not match the expected version, a warning is displayed (functions may still be partially usable).
| Setting | Description |
|---|---|
| Baud Rate | Serial communication speed; default: 115200 |
| Reset Delay | Wait time after connect before handshake is sent; default: 1500 ms |
Click Connect USB to establish the connection. The status dot indicates the state:
| Display | Meaning |
|---|---|
| Grey | Disconnected |
| Yellow (pulsing) | Handshaking |
| Green | Connected |
Note: The clock reboots once when you click Connect USB. This is normal — the reboot triggers the USB handshake. Wait for the status to show Connected.
When connected via USB, click Test WiFi Connection to send the SSID and password from the General tab to the clock and verify the WiFi connection. The status dot shows the result.
| Button | Function |
|---|---|
| Upload Config to Clock | Transfers the current (editor-displayed) configuration to the clock |
| Download Config from Clock | Downloads the config.txt from the clock and opens it in
the editor |
Clicking Set Clock Time from PC synchronizes the clock’s time with the PC’s current date and time.
Clicking Reboot Clock restarts the LISYclock. A confirmation dialog prevents accidental restarts.
Transfer any file (e.g. MP3, batch file) to the clock’s SD card.
When in USB mode, a protocol log panel shows all serial communication between the editor and the clock.
If the editor is opened via an HTTPS URL, the browser blocks all HTTP
requests to the clock. Solution: open
LISYclock_config_editor.html locally via
file://.
General settings for the LISYclock.
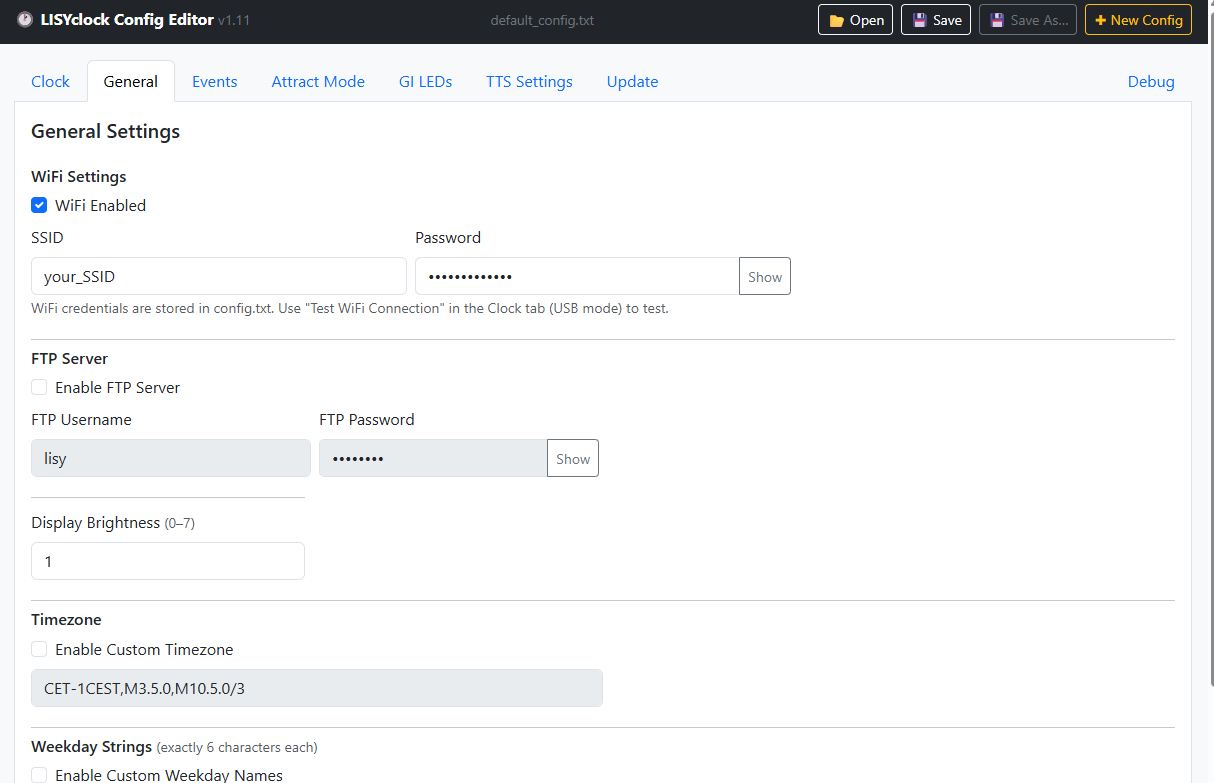
| Field | Description |
|---|---|
| Enabled (checkbox) | Enable/disable WiFi (WIFI_ENABLE=yes /
WIFI_ENABLE=no) |
| SSID | WiFi network name |
| Password | WiFi password (Show/Hide toggle available) |
WiFi credentials are stored in
config.txt. Use Test WiFi Connection in the Clock tab (USB mode) to verify that the credentials work.
Value from 0 (dark) to 7 (maximum
brightness). Corresponds to the configuration key
DISP_BRIGHT.
| Field | Description |
|---|---|
| Enabled (checkbox) | Enable/disable FTP server (#FTP_USER=… when
disabled) |
| Username | FTP login name |
| Password | FTP password |
| Field | Description |
|---|---|
| Enabled (checkbox) | Enable/disable timezone configuration |
| POSIX string | Timezone in POSIX format |
Example for Central Europe with daylight saving time:
CET-1CEST,M3.5.0,M10.5.0/3When enabled, the clock displays localized weekday names. Each of the 7 fields (Sunday–Saturday) may be at most 6 characters long. Shorter entries are automatically padded with spaces to 6 characters.
Example (English): Sun, Mon,
Tue, Wed, Thu, Fri,
Sat
Events define time-controlled actions of the LISYclock.
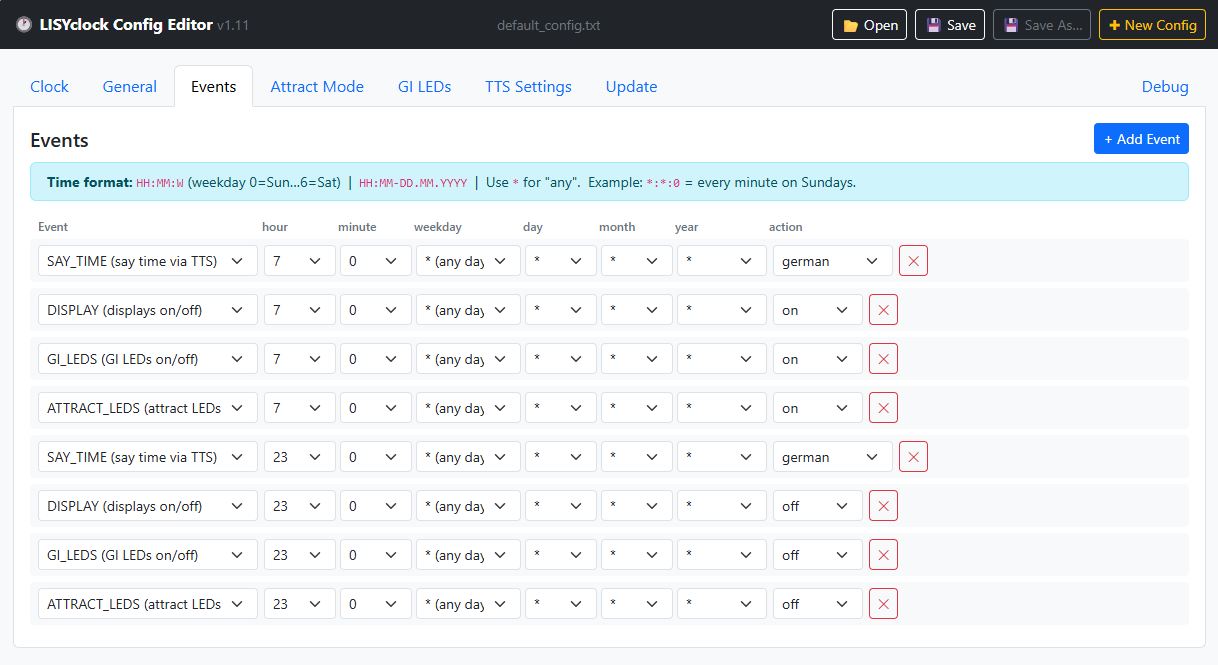
| Type | Description | Value Field |
|---|---|---|
| TTS | Output text via Text-to-Speech | Free text (e.g. “Good morning!”) |
| MP3 | Play an MP3 file from the SD card | Filename (e.g. alarm.mp3) |
| BATCH | Execute a batch file from the SD card | Filename (e.g. script.bat) |
| DISPLAY | Turn all displays on or off | Dropdown: on / off |
| SYNC_TIME | Synchronize time via NTP | Dropdown: 1–10 retry attempts |
| SAY_TIME | Say the current time via TTS | Dropdown: german / english /
italian |
| GI_LEDS | Turn all GI LEDs on or off | Dropdown: on / off |
| ATTRACT_LEDS | Turn all Attract LEDs on or off | Dropdown: on / off |
The time of an event is specified as
HH:MM:W or HH:MM-DD.MM.YYYY. *
stands for “any” in each field.
HH:MM:W| Field | Meaning |
|---|---|
HH |
Hour (0–23), * = every hour |
MM |
Minute (0–59), * = every minute |
W |
Weekday: 0 = Sunday, 1 = Monday, … 6 = Saturday, * =
daily |
HH:MM-DD.MM.YYYYActive when * (date) is selected in the weekday field.
The date field then appears additionally.
| Field | Meaning |
|---|---|
DD |
Day (1–31), * = every day |
MM |
Month (1–12), * = every month |
YYYY |
Year (four digits), * = every year |
| Time | Meaning |
|---|---|
7:30:1 |
Every Monday at 07:30 |
*:*:* |
Every minute, every day |
8:0:* |
Daily at 08:00 |
12:0-24.12.* |
Every December 24th at 12:00 |
*:0-*.*.* |
Every full hour, every day |
Defines the start colors of the GI LEDs (General Illumination).
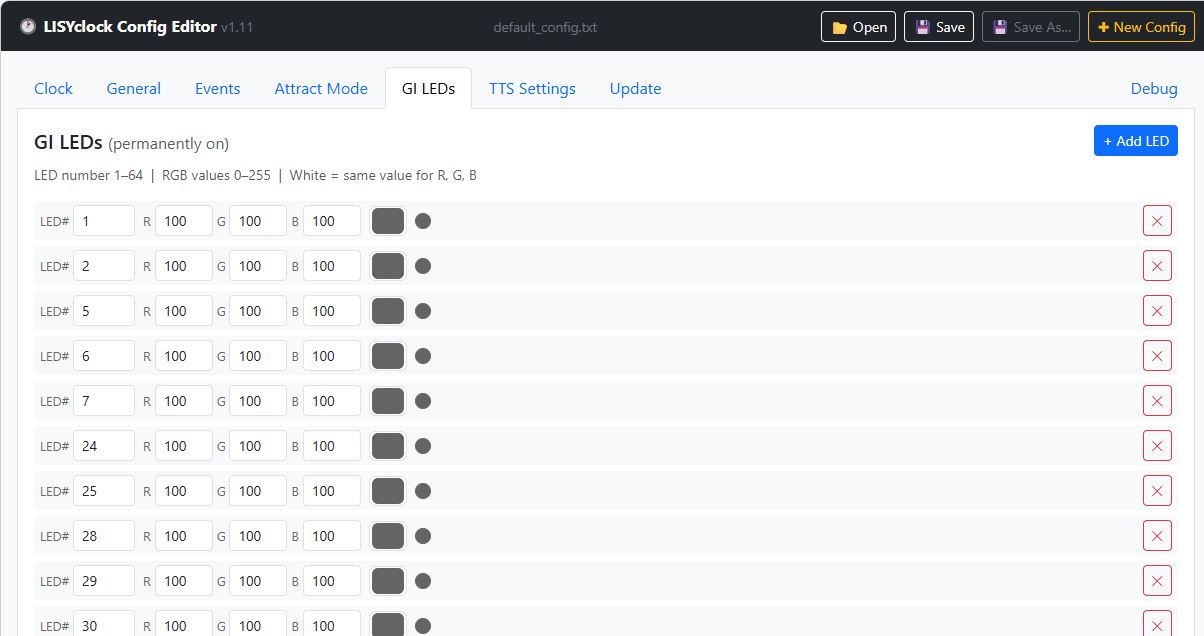
| Field | Description |
|---|---|
| LED | LED number (1–64) |
| R / G / B | Color value per channel (0–255) |
| Color picker | Opens a native color picker |
| Preview dot | Shows the current color as a small colored circle |
The color picker and RGB fields are synchronized: a change in the picker updates the RGB fields and vice versa.
Configures the Attract Mode lighting (running lights in standby) in 5 groups (AT1–AT5).
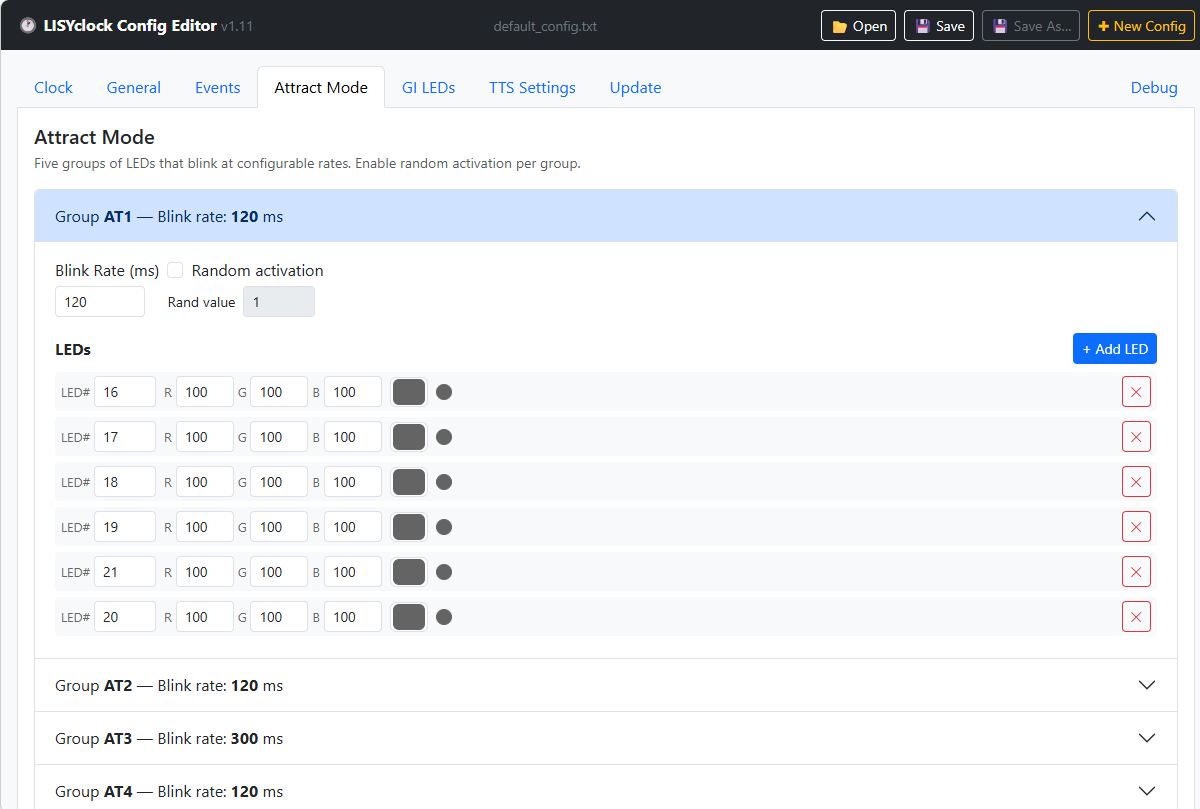
Each group is displayed as a collapsible accordion panel.
| Field | Description |
|---|---|
| Blink rate | Blink interval in milliseconds |
| Random activation | Checkbox: activate group randomly |
| Rand | Random threshold (0–255); the higher the value, the less frequently the group is activated |
| LED list | List of LEDs in this group (like GI LEDs: number, R, G, B, color picker) |
Settings for the Text-to-Speech function (uses the WIT.ai service).
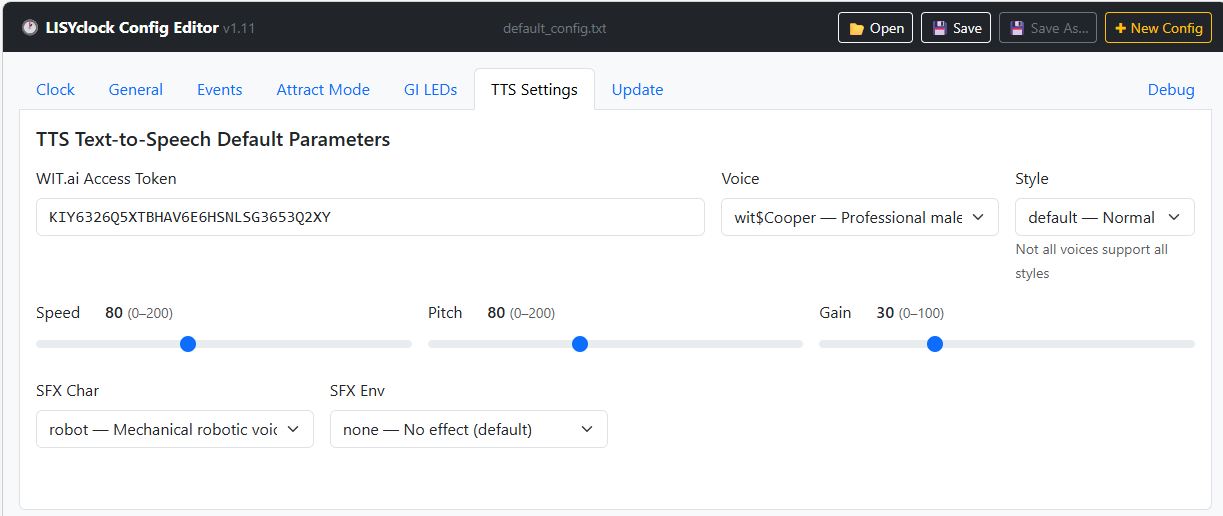
| Field | Possible Values | Default |
|---|---|---|
| WIT.ai Token | Free text (API key from wit.ai) | — |
| Voice | 17 voices (US EN, UK EN, CA EN), e.g. wit$Cooper |
wit$Cooper |
| Style | default / soft / formal /
fast / projected |
default |
| Speed | 0–200 | 80 |
| Pitch | 0–200 | 80 |
| Gain | 0–100 | 30 |
| SFX Char | none / chipmunk / monster /
daemon / robot / alien |
none |
| SFX Env | none / reverb / room /
cathedral / radio / phone |
none |
You obtain the WIT.ai API token after free registration at wit.ai.
The Update tab provides three ways to update the LISYclock firmware.
.bin firmware file using the file selection
buttonupdate.bin and the clock restarts
automatically to apply the updateWhen a server version is selected, it takes priority over a locally selected file.
Click Flash via USB to write the complete firmware package (bootloader, firmware binary, partition table, and OTA data) directly to the ESP32 via USB. No WiFi connection required.
Chrome/Edge only. A progress log is shown below the button during flashing. Do not disconnect the USB cable until flashing is complete.
The Debug tab provides a raw USB serial console for advanced users and developers.
Select the Baud Rate (default: 115200) and Reset Delay (default: 1500 ms), then click CONNECT. The status dot indicates the connection state:
| State | Meaning |
|---|---|
| Red | Disconnected |
| Yellow (pulsing) | Handshaking — waiting for ESP32 reset |
| Green (pulsing) | Connected |
The DTR/RTS signal states are shown in the top-right corner.
| Option | Description |
|---|---|
| Handshake | Enable/disable the 0x55 → OK:READY
handshake protocol. Disable for direct raw monitoring |
| Boot Logs | Show/hide ESP32 boot log lines |
| Auto-Scroll | Automatically scroll to the latest output |
| Timestamp | Add a timestamp to each received line |
Select the line ending appended to sent commands:
NL (\n), CR+NL, CR, or
None.
The console shows all serial output from the ESP32 with color-coded lines: - Green: received data - Orange: system messages - Red: errors - Dark grey: boot messages (when Boot Logs is enabled)
KEY=value=# at the start of a line disables
the line (without deleting it)| Rule | Description |
|---|---|
| FTP block | No space after #: #FTP_USER=lisy |
| Timezone | Space after #:
# TIMEZONE="CET-1CEST,…" |
| Weekday strings | Exactly 6 characters, padded with spaces: Mon |
EVENT_SYNC_TIME |
Value without quotes:
EVENT_SYNC_TIME=2:0:*,10 |
EVENT_SAY_TIME |
Value with quotes:
EVENT_SAY_TIME=14:12:*,"german" |
All other EVENT_* |
Value with quotes:
EVENT_TTS=8:0:*,"Good morning!" |
WIFI_ENABLE=yes
WIFI_SSID="MyNetwork"
WIFI_PWD="MyPassword"
DISP_BRIGHT=5
#FTP_USER=lisy
#FTP_PWD=lisy
# TIMEZONE="CET-1CEST,M3.5.0,M10.5.0/3"
EVENT_SYNC_TIME=2:0:*,10
EVENT_SAY_TIME=14:12:*,"german"
EVENT_TTS=8:0:*,"Good morning!"Use Chrome or Edge: Only these browsers support the File System Access API for native open/save dialogs and the Web Serial API for USB mode. In Firefox and Safari, standard file pickers or download links appear instead, and USB mode is unavailable.
Open locally for IP Clock access: If
communication with the LISYclock via IP does not work, check whether
LISYclock_config_editor.html is opened via
file:// (locally) and not via
https://.
FTP as alternative: The finished
config.txt can also be transferred to the clock’s SD card
via FTP (if the FTP server is enabled in the configuration).
Unknown keys: If the editor encounters unknown
keys when loading, it ignores them and displays a warning banner listing
the affected lines. They are not retained when saving. If you have
custom extensions in config.txt, back them up separately
beforehand.
No undo function: The editor has no undo function. If you make accidental changes, reopening the file (without saving first) will restore the previous state.
USB connection shared between tabs: When a USB connection is established in the Clock tab, it is automatically shared with the Debug tab and vice versa. There is only one USB connection at a time.
Created for LISYclock Config Editor v1.11